In today's fast-paced world where every second counts, it's important to make sure your computer is performing at its best. One way to do this is by setting the CPU priority level on your Windows 10 device. By prioritizing certain foreground applications, you can speed up their performance and increase your productivity. Here are some tips on how to do it:
Step 1: What is CPU Priority Level on Windows 10?
CPU priority level is a feature in Windows 10 that allows you to specify how much processing power a particular application should be given. By default, Windows 10 distributes processing power equally among all running applications. This means that if you have multiple programs running at the same time, they will all receive an equal share of the CPU's processing power. However, some applications require more processing power than others, and that's where CPU priority level comes in.
Step 2: How to Set CPU Priority to Prefer Foreground Apps?
The first thing you need to do is open the Task Manager. You can do this by pressing Ctrl + Shift + Esc on your keyboard or by right-clicking on the taskbar and selecting Task Manager from the menu. Once open, go to the Processes tab, and you will see a list of all the currently running applications on your device.
Step 3: Setting the Priority Level
Now that you have Task Manager open and the Processes tab selected, you can begin setting the CPU priority level for your desired application. To do this, right-click on the application and select Set priority from the menu. You will then see a list of priority levels ranging from Low to Realtime. For most applications, you will want to set the priority level to Above Normal or High. However, be careful when setting priority to Realtime. This setting is only recommended for applications that require immediate processing and could cause your device to crash or hang.
Step 4: Troubleshooting High CPU Usage
If you notice that your device is operating slowly or you experience higher-than-normal CPU usage, here are a few tips to troubleshoot the issue:
Idea 1: Close Unnecessary Applications
If you have multiple applications open, close any that you are not actively using. This will free up processing power for your foreground applications.
Idea 2: Check for Updates
Make sure all of your applications and programs are up-to-date. Older versions of software can be prone to errors and high CPU usage.

Idea 3: Scan for Malware
If you suspect that malware may be causing high CPU usage, run a full system scan with your preferred antivirus software.

Step 5: How to Set the CPU Process Priority Level?
If you want to set the CPU process priority level manually, here are the steps to follow:
Step 1: Open Task Manager
Press Ctrl + Shift + Esc on your keyboard or right-click on the taskbar and select Task Manager from the menu.
Step 2: Select the Process
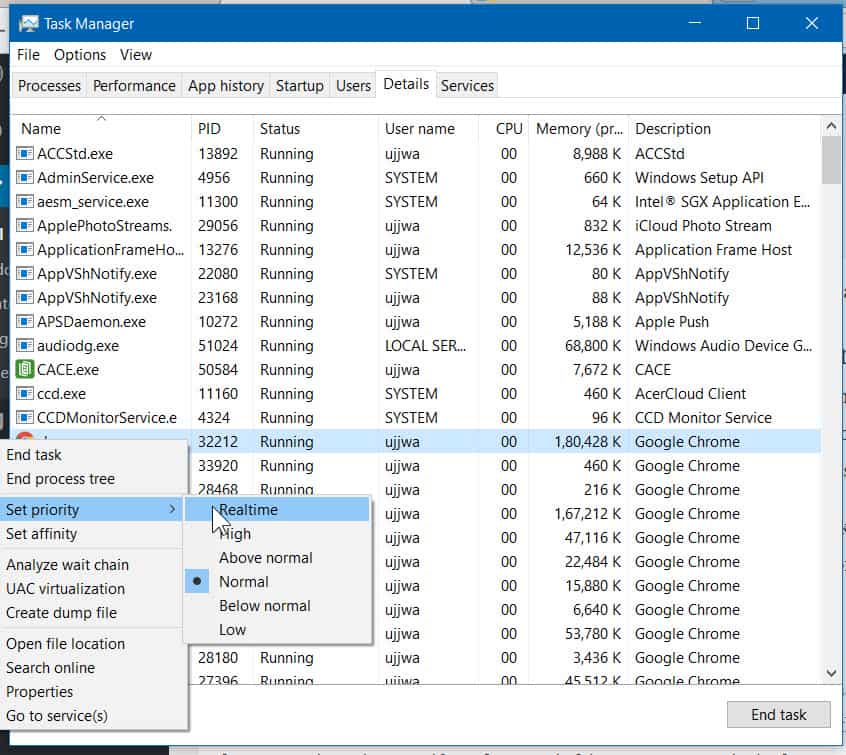
Go to the Details tab and select the process you want to adjust.

Step 3: Set Priority Level
Right-click on the process and select Set Priority. You will see a list of possible priority levels ranging from Realtime to Low. Again, use Realtime with caution, as it could cause your device to crash or hang.
Step 6: How to Set the CPU Process Priority for Applications?
If you want to set the CPU process priority for a specific application, follow these steps:
Step 1: Open Task Manager
Press Ctrl + Shift + Esc on your keyboard or right-click on the taskbar and select Task Manager from the menu.
Step 2: Go to Details Tab
Go to the Details tab and find the application you want to adjust.
Step 3: Right-Click and Select Set Priority
Right-click on the application and select Set Priority. Again, you will see a list of possible priority levels ranging from Realtime to Low.
Step 7: Change CPU Priority for Games
If you're an avid gamer, you may want to adjust your CPU priority for optimal gaming performance. Here's how:
Step 1: Open Task Manager
Press Ctrl + Shift + Esc on your keyboard or right-click on the taskbar and select Task Manager from the menu.
Step 2: Go to Details Tab
Go to the Details tab and find the game you want to adjust.
Step 3: Right-Click and Select Set Priority
Right-click on the game and select Set Priority. You can choose Above Normal or High for optimal gaming performance.

Step 8: Final Thoughts
Setting the CPU priority level on Windows 10 can help improve the performance of your foreground applications and increase your productivity. Just remember to use these settings with caution and avoid setting the priority level to Realtime unless absolutely necessary. By following these steps, you can optimize your device for maximum efficiency and get more done in less time.

Stay connected with us for more technology updates and tips!